Crystal Madrilejos

Design & Creative

embroideredart2012

We love encouraging our kids to be creative, especially when it comes to gifts. They are still so young so many of these gifts are collaborations between parents and kids, which I love! One day, they won’t need my help. But I’m hoping they will still want it!

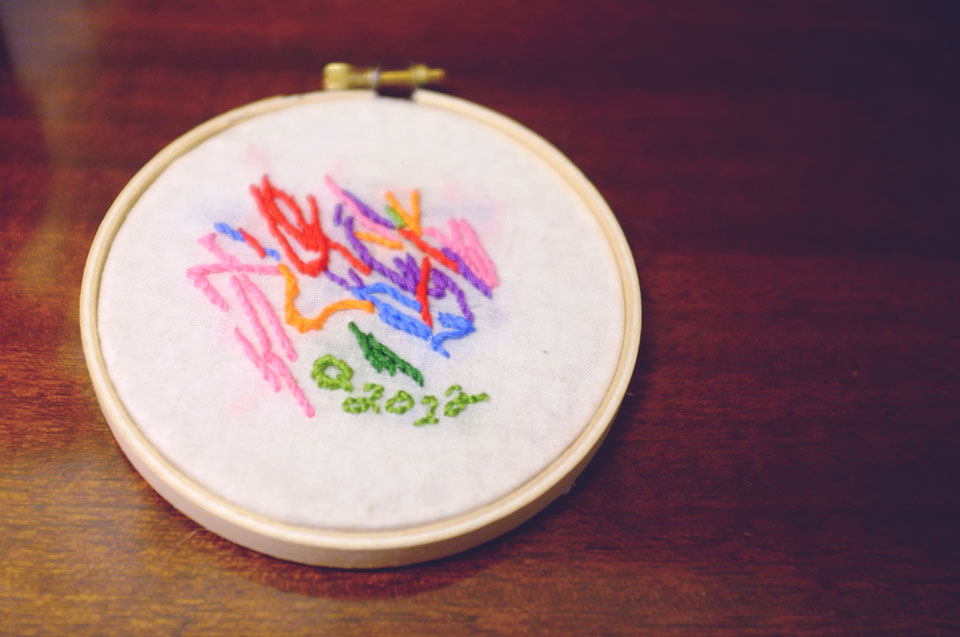
Quil draws or paints almost every day, so we always have a ton of paper with drawing and marks on them. So, I decided to take it up a notch and create something special together by helping him turn a drawing into an embroidered piece of art. The picture above is what we made for Quil’s Grammy last Christmas. Excuse the terrible embroidered text on there that is supposed to say “Q 2012” but looks more like “2022” ha!

Mind you, this is not a completely novel idea. Just search “Embroidered Kid Art” on Google and you will come up with endless posts. A lot of them involve transferring from paper to fabric, but I just had Quil draw directly onto the fabric. Maybe if your kid is older and makes really detailed and clearly representational images, it would be best to start with paper so they have more control, but Quil is still in the scribble phase, so directly on the fabric works for us. Or if you have an image they already created and love and think is worthy of saving in embroidered form, transfer is obviously the way to go.

Color, line and shape were the things I followed when embroidering over his marks. It’s a simple concept, but we learned a thing or two after our first try. (more…)

If you have lots of little humans in your life, legwarmers are great gifts that work up quick, and are fun and unique. When I first started knitting and crocheting, like most beginners, I didn’t work much outside the realm of scarves. They are simple and easy, but there are only so many winter scarves a person needs. However, legwarmers are a little out of the ordinary unless you are a dancer. And there are so many different ways styles and patterns you can make, but they still look cool and work well when they are really simple.

(more…)

As promised, I put together the pattern for the crocheted toy bags that I’ve been making lately. This is the first pattern I’ve written, so bear with me and please let me know if you find any errors or if any of the directions are confusing. (more…)

Living in an old farmhouse has its charms, but freezing cold floors is not one of them. However, this can easily be remedied with super cute slippers!

IMG_6777

I crocheted and felted these for Quil and Ellis (though cold floors are the least of her concerns) for these chilly months that are upon us. Last year, we got Quil a pair from H&M that worked well enough but I decided to make them this year after seeing this pattern on Ravelry.

You can purchase the Easy Felted Crochet Kids Slippers by Sarah Lora pattern on Ravelry for only $3.50. It comes with directions for sizes Newborn to 4T and directions on felting and making the slippers non-skid.

IMG_6928

Q wears around a toddler size 7-8 shoe and I made the medium-sized slipper. They fit but still have some room to grow over the winter months. The non-skid works great on our hardwood floors. Ellis’ are still pretty big even though I made the newborn size. Luckily for her, Andrew’s brother’s wife made an adorable knit pair that will fit until she grows into the ones I made.

IMG_6769

IMG_6781

I used Cascade Ecological Wool yarn in Natural and Silver and they felted up beautifully.

If anyone else decides to make a pair, I’d love to see photos!

**Update**
I eventually had to cover the puffy paint soles with suede as a more permanent non-slip solution. I found that with our hardwood, the puffy paint would get dusty and eventually harden up and become slippery again. I would occasionally wipe them down and the stick would return for a short time, but the leather seems to work much better (though a bit hard on the fingers to have to sew through! Excuse the terrible color of the photo below. Bad lighting!)

2013-09-08 21.51.28 copy

While we’re waiting, waiting, waiting for Baby Girl to arrive, I’ve been doing what is normal for anyone who is mega-preggers – taking on huge projects that are made infinitely more difficult by my huge belly and constant body pains. That’s normal, right? Right?!

So, my current obsession and project in the works: crocheted rag rugs! We’ve been in the process of fixing up the kids’ room – which I hope to post about soon – and one of the rugs we have in their room is just too big, in my opinion. So, of course, I decided to make a new one. You know, before the baby comes. Ha!

I was trolling Ravelry (if you are a knitter or crocheter and aren’t on Ravelry, do yourself a favor and check it out now!) and came across this amazing crocheted Calico Rag Rug by Gillian Hamilton which inspired me to give it a shot. I did a little more research and also came across King Soleil which has a whole page dedicated to her process of creating rag rugs and tips and tricks she’s learned through her experience. She mainly uses upcycled materials, which really appeals to me since the amount of material it takes to make one rug can get pricey. I’m thinking a thrift store run is in order!

However, this current one that I’m working on (pictured above) is made from muslin that I purchased at the local fabric store. Basically all you have to do is find any sort of woven material you want, cut it into long strips and start crocheting in a circle and, Voila! you have a rug!

So far my rug is about 2 feet in diameter and there are few things I’ve learned:

l. Crocheting on a large scale is a workout. Think less wrist movement and more entire arm movement. Multiple times I’ve had to ask Andrew, “Is it hot in here?” Nope, just doing my crochet workout.

2. Working with such large pieces of fabric yarn requires the largest crochet hook I’ve ever seen. It’s obscenely large and slightly embarrassing. The hook I’m using for this particular rug is a 15mm – Q hook.

3. I’m a pretty experienced crocheter and I still had some problems with the rug getting wonky and wavy. I’m still not exactly sure why this was happening but with some minor adjusting I was able to straighten it out and it seems to be back on track.

I will post more pictures when the rug is done, which hopefully will be sooner than later.

-c.

Finally! A million years later and I’m done with Baby Girl’s blanket. And yes, 3 weeks (or less) to go and we still don’t have a name picked out.

This is actually the only blanket that I’ve ever knitted. In the past, I’ve only made wearable things. I always thought making a blanket would just take too long. It did take a lot of time to make, but in the end, I’m happy that I did it.

Some details about the project you can read about in my previous blanket update. But just to reiterate, I got the pattern from the Purl Bee blog. I didn’t use any fancy yarns, just whatever they had at the local craft store. Next time, I think I will invest in some better quality yarn but I wanted to be sure I could commit to an entire blanket before shelling out cash for the good stuff. My color inspiration came from these blocks by Ambrosia Girl, but obviously I changed them up a bit. It was really the jumping off point. And since we are having a girl, I figured it would be good to balance out all the pink that, I’m sure, will be in her future.

-c.

Looking at my post from the other day, I was slightly depressed by not having any new photos to post (the one I posted was old and already posted to my Instagram account…boooring.) Since getting an iPhone I’ve been extra lazy about breaking out the real camera to take photos. Bad technology! Bad, bad! Ha!

Anyhoo, this post is an update on the baby blanket that I’ve been working on for the past 3 months or so. I found The Forever Baby Blanket pattern on one of my favorite crafting/fiber/blog sites, The Purl Bee.  I just wanted something super simple that I could zone out while doing or just sit and not have to be 100% focused on some elaborate pattern. I’m also relatively new to knitting so I didn’t want to be overwhelmed when I knew that the time I had to dedicate to crafting was going to be limited.

This blanket turned out to be just what I needed. The pattern itself is really simple, but not boring. It’s a rib knit so it’s thick and squishy with a lot of texture. My color inspiration came from these blocks (minus the gold + a lighter grey):

I’m still on the fence as to whether I’m going to use black. I bought some with the intention of using it, but when I put all the colors together it seemed too bold to me. Incorporating the lighter grey helps, but we’ll see. I’m winging it for the time being.

I didn’t use any fancy yarns (which I’m slightly regretting) but my reasoning was that 1.) I wanted to see if I was committed enough to finish an entire blanket and 2.) I was unsure if my skills justified using something a bit pricier. However, part of me is glad that I didn’t splurge on this particular project. I did mess up a bunch in the beginning when I was trying to catch my knitting stride so there are definitely some imperfections. I would have been super pissed if I bought nice yarn and wasn’t completely happy with how it turned out. But now that I feel a lot more confident in my skills, I think for my future projects I won’t’ feel intimidated spending a little more on better quality materials.

I’m hoping one day to have some of Andrew’s parents Alpaca wool processed and have someone spin it into yarn for me. Now THAT, my friends, would be super fancy.

-c.

This pregnancy has flown by. Only 6.5 weeks to go and I’m feeling the restlessness that comes with the last home stretch.

It’s a bit late in the pregnancy to be in the nesting phase, but having a 2-year-old, a new job, and a lingering illness to contend with has pushed us into month 8 with much still left to do. There is a reason they say you should get as much done as possible in the 2nd trimester because, dang, is it hard to do much with this huge belly.

When I was pregnant with Q, we had all the time in the world to just… do stuff. I was crafting up a storm. Andrew was building and baking awesome things. It’s taken me the entire pregnancy to knit one stinkin’ baby blanket (pictured above – back when I first started the darn thing months ago!) and the jury’s still out on whether it will be done by the time baby girl comes. I started a baby sweater, but I’ve given up any hope that particular project will get done.

Luckily, Andrew is super awesome and has been able to take the reins on many of the things on our to-do list. I just make lists at this point. Make lists and grow a baby. That’s my to-do list.

But still, however long our to-do list is, it feels good to have our little family getting it all done together. Hoping to have more photos of our progress in the near future!

-c.


Quil is approaching 8 months-old! I can’t believe how fast these past months have gone. I looked back at the pictures we’ve taken of him and realize there are so many baby projects that we never revisited after Q was born.

The co-sleeper is still attached to our bed and now that Q is sleeping in his crib (another project we never posted about!) I’ve gone back to using the co-sleeper as my nightstand. He slept in the co-sleeper for about two months before he grew out of it. One thing we learned—the wool side extenders weren’t necessary. They looked nice, but we ended up taking them out. He moved so little at that age and the co-sleeper was so close to the wall, there really wasn’t any possibility of him rolling out.


Here he is being cute! He slept on a Sassy Vented Sleeper Wedge (which I hear now is a no-no!) because he had reflux and having him on a incline helped.

–c.


Remember this guy?

In the months before Q was born, both Andrew and I had a surge of productivity. I think it was our collective subconscious preparing us for a drought. We’ve been fortunate that Q is a good sleeper now. After his bedtime and before he wakes is our free time and both Andrew and I have been able to work on some new projects.

I figured an update is in order for the projects that we worked on before Q arrived.

I should preface this update with the fact that the majority of the time Q wears Fuzzi Bunz cloth pocket diapers. We were lucky enough to have generous family and friends who bought us these fancy pants (since they can be on the pricey side).

In making the wool diaper covers I was preparing for the possibility that we might not be gifted any fancy diapers. In that case we would have to use the more cost friendly pre-fold cloth diapers that require a water resistant covering. There have been times when we ran out of the pocket diapers and had to use the pre-folds as a back up. Despite my initial skepticism, the wool covers work unbelievably well. The amazing thing about wool is that it repels water and absorbs moisture at the same time! If you want to read more about the wonders of wool, you can read more here.

Here is Q sporting a pair of diaper covers made from a repurposed wool sweater that I felted in the washing machine:

The crocheted cover and the knitted cover were also a success! The crocheted ones are still a bit large, but he’s already outgrown the Vanilla cover, so I’m in the process of knitting a larger size.

-c.