Crystal Madrilejos

Design & Creative

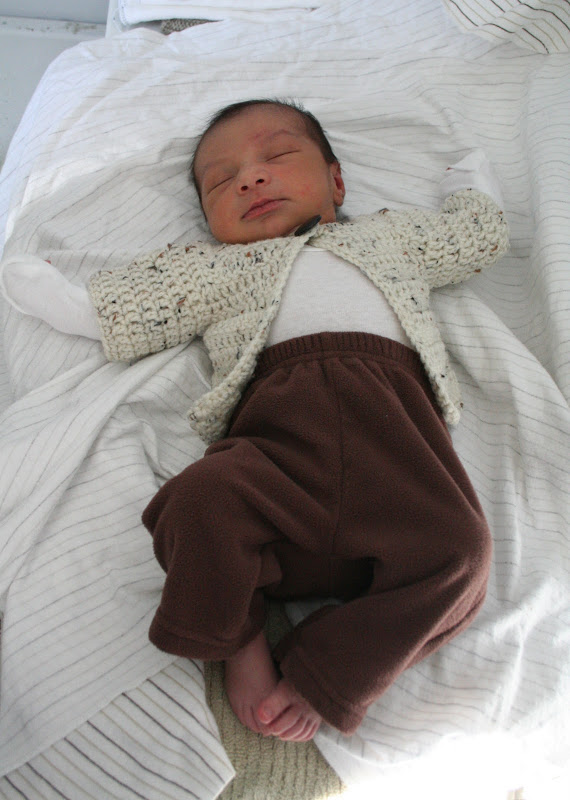
I started this jumper back in 2010 when I was pregnant with Quil and didn’t get around to finishing it until a couple months before Ellis was born (2 years later -yikes!) I used the Tutu Onesy and Hat – Crochet pattern, sans the hat, by Lion Brand that I found on Ravelry. The pattern is sized for an 18-month old, but I modified it so that it would be for a newborn.

Ellis is about 3 and a half weeks old and it fits like a glove. I initially brought it to the hospital thinking she could wear it home, but it was still too big. Luckily, I tried it on her a couple days ago for the first time. Had I waited much longer, she might not have fit!
I used black Lion Brand Microspun yarn instead of the multi-color stripes in the pattern photo and removed the little skirt/ruffle thingy since I didn’t know if I was having a boy or a girl when I was pregnant with Q. Honestly, I probably would have removed the ruffle anyway because I’m not a fan of it to begin with. Also, I added snaps in the crotch area for easy access when changing baby’s diaper because it would be a pain in the butt to have to take this entire thing off every time.

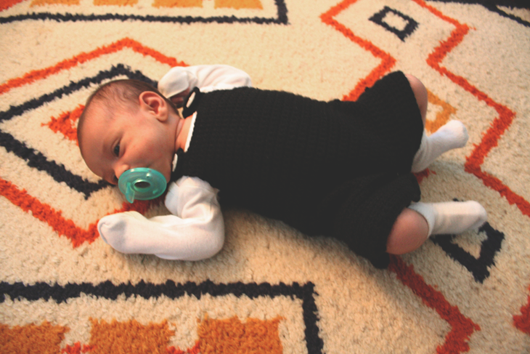
Look at that cutie! If anyone else makes one, send me a photo! I would love to see :)

-c.

While we’re waiting, waiting, waiting for Baby Girl to arrive, I’ve been doing what is normal for anyone who is mega-preggers – taking on huge projects that are made infinitely more difficult by my huge belly and constant body pains. That’s normal, right? Right?!

So, my current obsession and project in the works: crocheted rag rugs! We’ve been in the process of fixing up the kids’ room – which I hope to post about soon – and one of the rugs we have in their room is just too big, in my opinion. So, of course, I decided to make a new one. You know, before the baby comes. Ha!

I was trolling Ravelry (if you are a knitter or crocheter and aren’t on Ravelry, do yourself a favor and check it out now!) and came across this amazing crocheted Calico Rag Rug by Gillian Hamilton which inspired me to give it a shot. I did a little more research and also came across King Soleil which has a whole page dedicated to her process of creating rag rugs and tips and tricks she’s learned through her experience. She mainly uses upcycled materials, which really appeals to me since the amount of material it takes to make one rug can get pricey. I’m thinking a thrift store run is in order!

However, this current one that I’m working on (pictured above) is made from muslin that I purchased at the local fabric store. Basically all you have to do is find any sort of woven material you want, cut it into long strips and start crocheting in a circle and, Voila! you have a rug!

So far my rug is about 2 feet in diameter and there are few things I’ve learned:

l. Crocheting on a large scale is a workout. Think less wrist movement and more entire arm movement. Multiple times I’ve had to ask Andrew, “Is it hot in here?” Nope, just doing my crochet workout.

2. Working with such large pieces of fabric yarn requires the largest crochet hook I’ve ever seen. It’s obscenely large and slightly embarrassing. The hook I’m using for this particular rug is a 15mm – Q hook.

3. I’m a pretty experienced crocheter and I still had some problems with the rug getting wonky and wavy. I’m still not exactly sure why this was happening but with some minor adjusting I was able to straighten it out and it seems to be back on track.

I will post more pictures when the rug is done, which hopefully will be sooner than later.

-c.

Finally! A million years later and I’m done with Baby Girl’s blanket. And yes, 3 weeks (or less) to go and we still don’t have a name picked out.

This is actually the only blanket that I’ve ever knitted. In the past, I’ve only made wearable things. I always thought making a blanket would just take too long. It did take a lot of time to make, but in the end, I’m happy that I did it.

Some details about the project you can read about in my previous blanket update. But just to reiterate, I got the pattern from the Purl Bee blog. I didn’t use any fancy yarns, just whatever they had at the local craft store. Next time, I think I will invest in some better quality yarn but I wanted to be sure I could commit to an entire blanket before shelling out cash for the good stuff. My color inspiration came from these blocks by Ambrosia Girl, but obviously I changed them up a bit. It was really the jumping off point. And since we are having a girl, I figured it would be good to balance out all the pink that, I’m sure, will be in her future.

-c.

Looking at my post from the other day, I was slightly depressed by not having any new photos to post (the one I posted was old and already posted to my Instagram account…boooring.) Since getting an iPhone I’ve been extra lazy about breaking out the real camera to take photos. Bad technology! Bad, bad! Ha!

Anyhoo, this post is an update on the baby blanket that I’ve been working on for the past 3 months or so. I found The Forever Baby Blanket pattern on one of my favorite crafting/fiber/blog sites, The Purl Bee.  I just wanted something super simple that I could zone out while doing or just sit and not have to be 100% focused on some elaborate pattern. I’m also relatively new to knitting so I didn’t want to be overwhelmed when I knew that the time I had to dedicate to crafting was going to be limited.

This blanket turned out to be just what I needed. The pattern itself is really simple, but not boring. It’s a rib knit so it’s thick and squishy with a lot of texture. My color inspiration came from these blocks (minus the gold + a lighter grey):

I’m still on the fence as to whether I’m going to use black. I bought some with the intention of using it, but when I put all the colors together it seemed too bold to me. Incorporating the lighter grey helps, but we’ll see. I’m winging it for the time being.

I didn’t use any fancy yarns (which I’m slightly regretting) but my reasoning was that 1.) I wanted to see if I was committed enough to finish an entire blanket and 2.) I was unsure if my skills justified using something a bit pricier. However, part of me is glad that I didn’t splurge on this particular project. I did mess up a bunch in the beginning when I was trying to catch my knitting stride so there are definitely some imperfections. I would have been super pissed if I bought nice yarn and wasn’t completely happy with how it turned out. But now that I feel a lot more confident in my skills, I think for my future projects I won’t’ feel intimidated spending a little more on better quality materials.

I’m hoping one day to have some of Andrew’s parents Alpaca wool processed and have someone spin it into yarn for me. Now THAT, my friends, would be super fancy.

-c.

This pregnancy has flown by. Only 6.5 weeks to go and I’m feeling the restlessness that comes with the last home stretch.

It’s a bit late in the pregnancy to be in the nesting phase, but having a 2-year-old, a new job, and a lingering illness to contend with has pushed us into month 8 with much still left to do. There is a reason they say you should get as much done as possible in the 2nd trimester because, dang, is it hard to do much with this huge belly.

When I was pregnant with Q, we had all the time in the world to just… do stuff. I was crafting up a storm. Andrew was building and baking awesome things. It’s taken me the entire pregnancy to knit one stinkin’ baby blanket (pictured above – back when I first started the darn thing months ago!) and the jury’s still out on whether it will be done by the time baby girl comes. I started a baby sweater, but I’ve given up any hope that particular project will get done.

Luckily, Andrew is super awesome and has been able to take the reins on many of the things on our to-do list. I just make lists at this point. Make lists and grow a baby. That’s my to-do list.

But still, however long our to-do list is, it feels good to have our little family getting it all done together. Hoping to have more photos of our progress in the near future!

-c.

As promised, I whipped up this tutorial for the ponchos I posted about a couple weeks ago. This is my first tutorial, so bear with me. Writing tutorials is hard work. Especially when I could only work on it for mere minutes at a time. I’m hoping that I don’t confuse anyone with my directions.

Granny Square Poncho Tutorial
Materials: Yarn, Crochet hook, embroidery needle and safety pins
Step 1: Crochet four Granny Squares of equal size. If you aren’t familiar with how a Granny Square is made, read Purl Bee’s tutorial on the Classic Granny Square Pattern.

The size of the poncho is going to depend on the size Granny Square you make. The diagonal measurement of the square equals the length of the poncho from neck opening to the bottom of the poncho point, like so:

Step 2: When you’ve completed your squares (i’m sure they look lovely), arrange the squares according to this diagram and attach edges together using safety pins.

Step 3: Using an embroidery needle and yarn, begin sewing together sides. Remove safety pins as you go.

(Optional) Step 4: To create a smaller neck opening or to build up a little bit of a cowl neckline: Single crochet around the neck opening to the desired height. Done!

If you have any questions, feel free to comment of email me directly. I’m not sure such a simple project warranted such a lengthy explanation, but oh well! You’re welcome! :)

I also spent some minutes putting together a printable version of this tutorial, you know, just in case you’re like me and have binders full of project ideas that I never get around to doing. (Though, I really hope you try this one and tell me how it goes. Oh! And send pictures of your creations too!)

Download the Granny Square Poncho Tutorial here.

Enjoy!
– c.

P.S. Just one last thing before I let you get crafting, this pattern is for personal use only. Please don’t sell this pattern or any project made from this pattern. Feel free to share this and make as many as you please for everyone you know, BUT please please don’t sell them.  Thank you!

I figured I’d post about a couple Christmas gifts I made this past year. This weather is crazy. But I guess I shouldn’t expect anything different since it’s Ohio and we go through this every year.

I realize Christmas is long over. Maybe next year I will post in a more timely manner. But I won’t hold my breath. Anyways! On to gifts!

Many many years ago, a friend and I started crocheting together and we went through a phase of making granny squares. Our grand plan was to make a ton of squares, and through our combined effort, a blanket of granny squares for each of us. Long story short, this didn’t happen and all these years I’ve been holding onto these squares. Until this past Christmas when I found the perfect use! Little ponchos!!!

Those little ladies are two of my nieces. They are both around 2 years old and the ponchos fit great! Basically, I took 4 granny squares and sewed them edge to edge. They were super simple to make. Look for a tutorial to this little poncho in the near future!

-c.


Remember this sweater I made when I was pregnant? Quil wore it on his first outing to his Lolo and Lola’s for his Cousin Layla’s 1st birthday party.

He was so tiny!

-c.


Quil is approaching 8 months-old! I can’t believe how fast these past months have gone. I looked back at the pictures we’ve taken of him and realize there are so many baby projects that we never revisited after Q was born.

The co-sleeper is still attached to our bed and now that Q is sleeping in his crib (another project we never posted about!) I’ve gone back to using the co-sleeper as my nightstand. He slept in the co-sleeper for about two months before he grew out of it. One thing we learned—the wool side extenders weren’t necessary. They looked nice, but we ended up taking them out. He moved so little at that age and the co-sleeper was so close to the wall, there really wasn’t any possibility of him rolling out.


Here he is being cute! He slept on a Sassy Vented Sleeper Wedge (which I hear now is a no-no!) because he had reflux and having him on a incline helped.

–c.


Remember this guy?

In the months before Q was born, both Andrew and I had a surge of productivity. I think it was our collective subconscious preparing us for a drought. We’ve been fortunate that Q is a good sleeper now. After his bedtime and before he wakes is our free time and both Andrew and I have been able to work on some new projects.

I figured an update is in order for the projects that we worked on before Q arrived.

I should preface this update with the fact that the majority of the time Q wears Fuzzi Bunz cloth pocket diapers. We were lucky enough to have generous family and friends who bought us these fancy pants (since they can be on the pricey side).

In making the wool diaper covers I was preparing for the possibility that we might not be gifted any fancy diapers. In that case we would have to use the more cost friendly pre-fold cloth diapers that require a water resistant covering. There have been times when we ran out of the pocket diapers and had to use the pre-folds as a back up. Despite my initial skepticism, the wool covers work unbelievably well. The amazing thing about wool is that it repels water and absorbs moisture at the same time! If you want to read more about the wonders of wool, you can read more here.

Here is Q sporting a pair of diaper covers made from a repurposed wool sweater that I felted in the washing machine:

The crocheted cover and the knitted cover were also a success! The crocheted ones are still a bit large, but he’s already outgrown the Vanilla cover, so I’m in the process of knitting a larger size.

-c.