Crystal Madrilejos

Design & Creative

tunictop2

I mentioned that I’m a bit of a crazy when it comes to gifts, I prefer to make them if I am able. This past Christmas was no exception. I made this linen tunic for my niece Layla , who will be turning five in a few months. I’ve really been into linen lately and wanted to give this style of shirt/dress/tunic a try in hopes to eventually make more for Ellis and, one day, myself.

I haven’t made too many wearables other than crochet or knit things. Sewing isn’t my specialty. I’ve never taken a sewing class and a lot of times I’m just winging it as I go and always present it with the caveat of: don’t look too closely. I know the basics and I can follow instructions, that’s about my level of expertise in the matter. I also don’t sew with knits if I can avoid it. Not for lack of desire, but the whole stretchiness thing throws me for a loop. But I’m happy with how these turned out. The embroidery was also a new adventure for me too. I’ve embroidered before, but not on clothing and nothing so complicated, but all-in-all, it was a success. (more…)

embroideredart2012

We love encouraging our kids to be creative, especially when it comes to gifts. They are still so young so many of these gifts are collaborations between parents and kids, which I love! One day, they won’t need my help. But I’m hoping they will still want it!

Quil draws or paints almost every day, so we always have a ton of paper with drawing and marks on them. So, I decided to take it up a notch and create something special together by helping him turn a drawing into an embroidered piece of art. The picture above is what we made for Quil’s Grammy last Christmas. Excuse the terrible embroidered text on there that is supposed to say “Q 2012” but looks more like “2022” ha!

Mind you, this is not a completely novel idea. Just search “Embroidered Kid Art” on Google and you will come up with endless posts. A lot of them involve transferring from paper to fabric, but I just had Quil draw directly onto the fabric. Maybe if your kid is older and makes really detailed and clearly representational images, it would be best to start with paper so they have more control, but Quil is still in the scribble phase, so directly on the fabric works for us. Or if you have an image they already created and love and think is worthy of saving in embroidered form, transfer is obviously the way to go.

Color, line and shape were the things I followed when embroidering over his marks. It’s a simple concept, but we learned a thing or two after our first try. (more…)

If you have lots of little humans in your life, legwarmers are great gifts that work up quick, and are fun and unique. When I first started knitting and crocheting, like most beginners, I didn’t work much outside the realm of scarves. They are simple and easy, but there are only so many winter scarves a person needs. However, legwarmers are a little out of the ordinary unless you are a dancer. And there are so many different ways styles and patterns you can make, but they still look cool and work well when they are really simple.

(more…)

Ever since the babies started arriving in our family almost 13 years ago, Andrew and I have been hand-making gifts for the holiday. It’s something we enjoy doing because we like to be able to make things that are really personal and specific to their personality and interest. But also, we like that it’s not something that they can go out and buy themselves. In the coming weeks, I’m going to highlight some projects we’ve made in the past in case you want to give them a try yourself. (more…)

I mentioned in my last post that I’d post about the Totoro party, so here I am making good on that! The party, overall, was a success. Considering how little planning I did and just sort of threw some things together at the last minute, I was pretty happy with how the decorations turned out. If you aren’t familiar with the movie “My Neighbor Totoro,” you should check it out. Quil loves it (obviously,) as do Andrew and I
Also, BIG THANKS to my sister Maria for hosting and helping with decorating and making food and baking the mini-cakes. She is the best planner and most organized person I know. No family holiday or event could take place without her. The members of our family would all be arriving at different locations at different times and there’d be no food if she didn’t wrangle us all together! She really is “the glue” in our family.
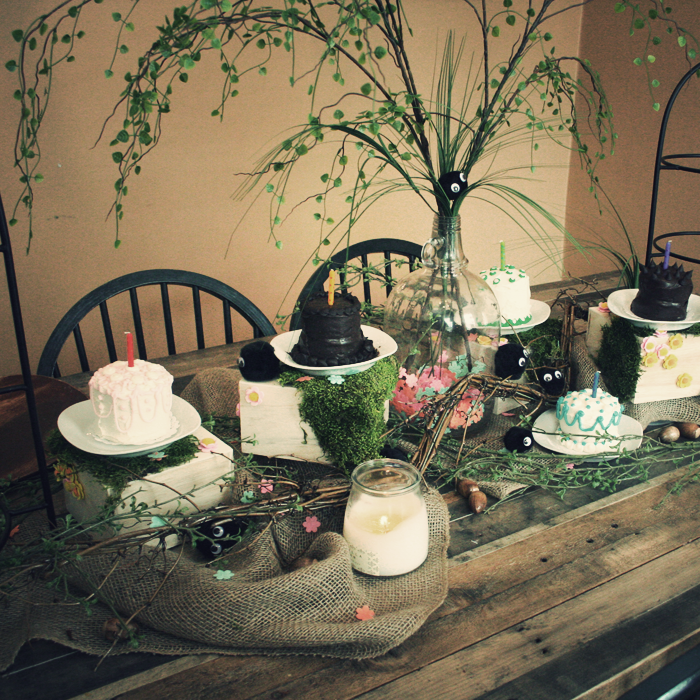
Here are various photos of the different details. Totoro is a forest spirit so a lot of the theme was basically nature related. 
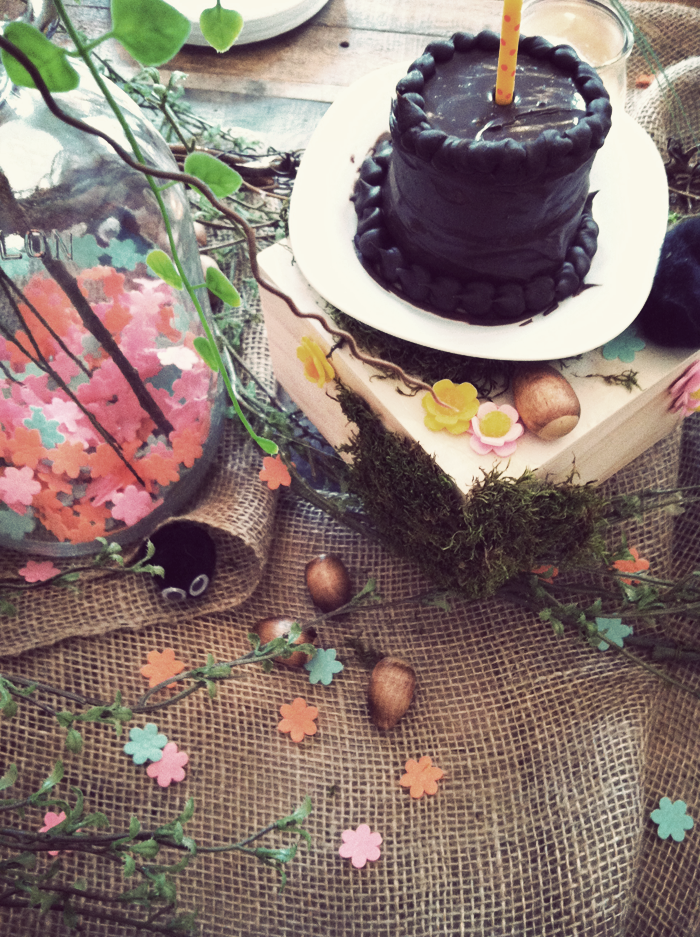
The table center piece consisted of faux-plants, dried moss, grapevines, fabric flowers, and flower stickers. I hot-glued dried moss to wooden boxes from the dollar aisle at Target, we then used as risers for the cakes. 
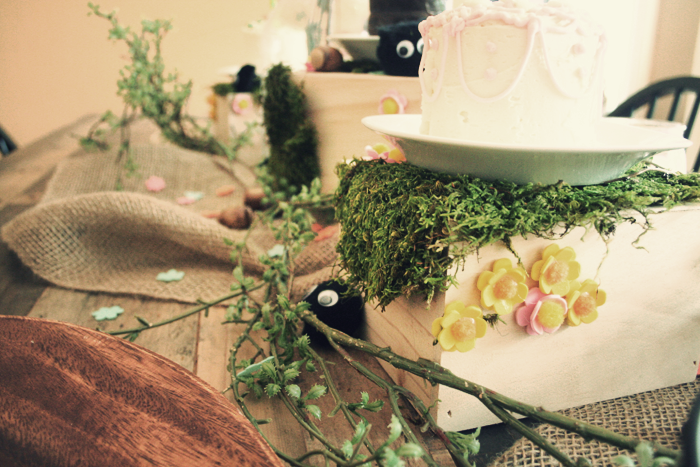
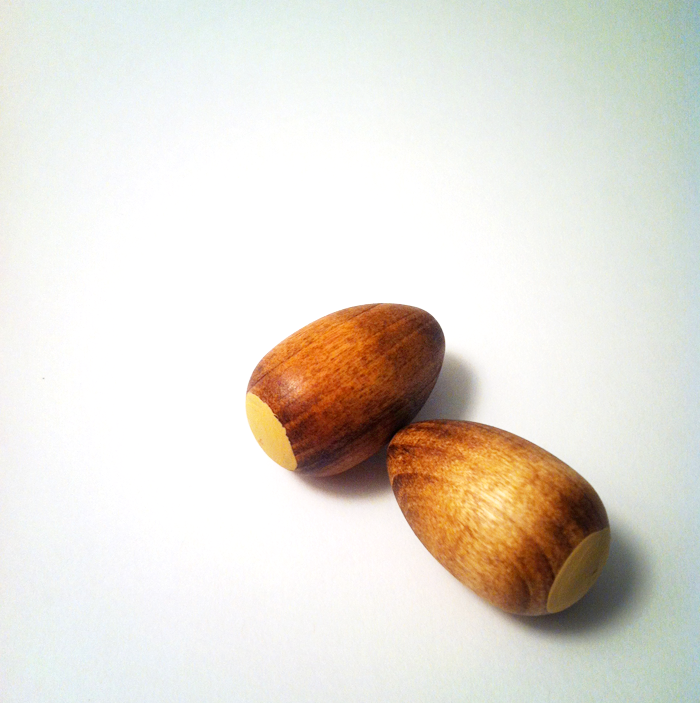
These wooden acorns were made from mini-wooden eggs found at the local craft store that I stained and painted to look like the acorns the Mei collects in the film. It’s hard to see in this photo, but they have a clear coat of gloss spray on them as well. 
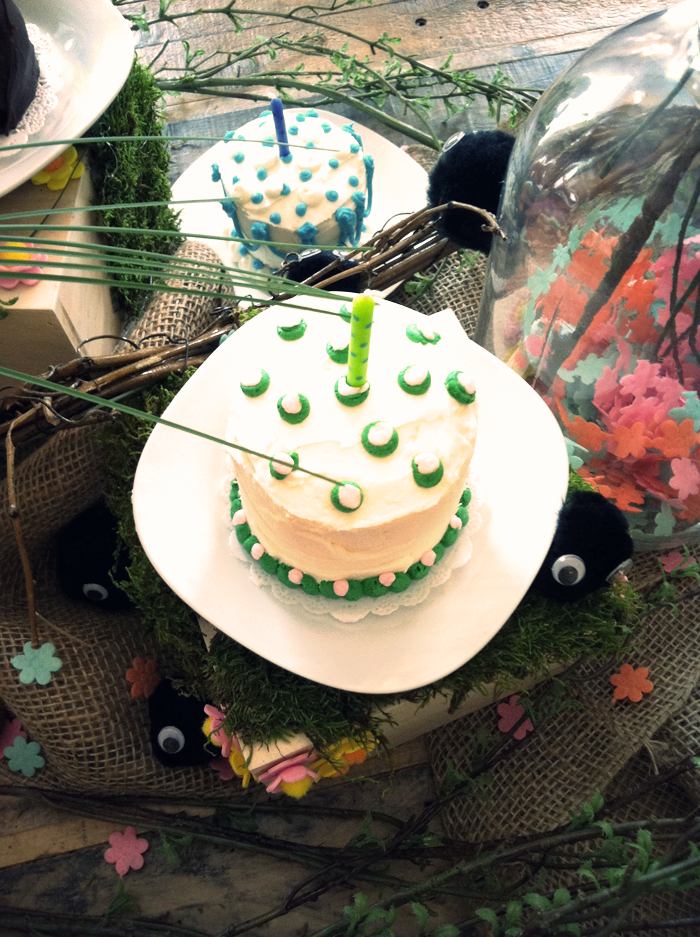
Here is a wider view of the table with all the mini-cakes (there were five birthdays being celebrated. We have a big family!) All the faux-plants were purchased from a local craft and hobby store. 
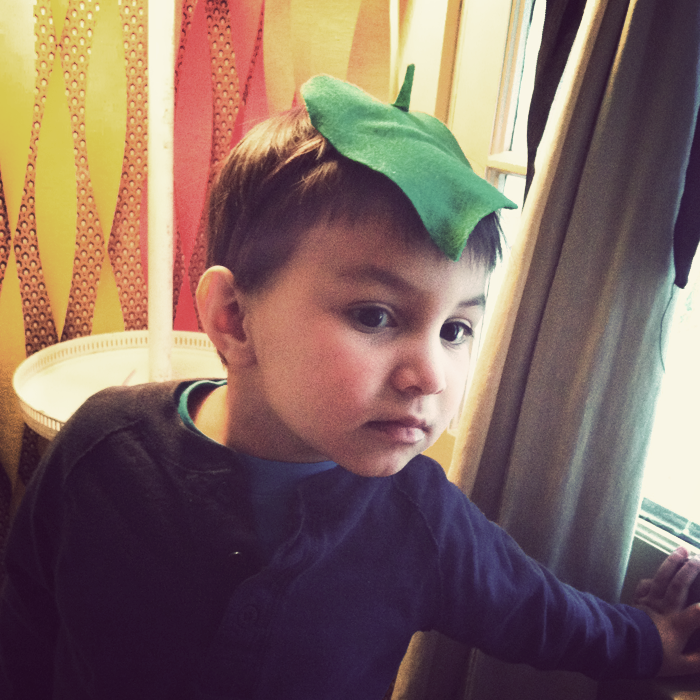
In place of party hats, we had a few leaf hats based on the scene from the movie where Totoro has a leaf on his head to protect from the rain. These were pieces of felt cut in the shape of a leaf, with a little extra piece for the stem, hot glued to brown headbands.
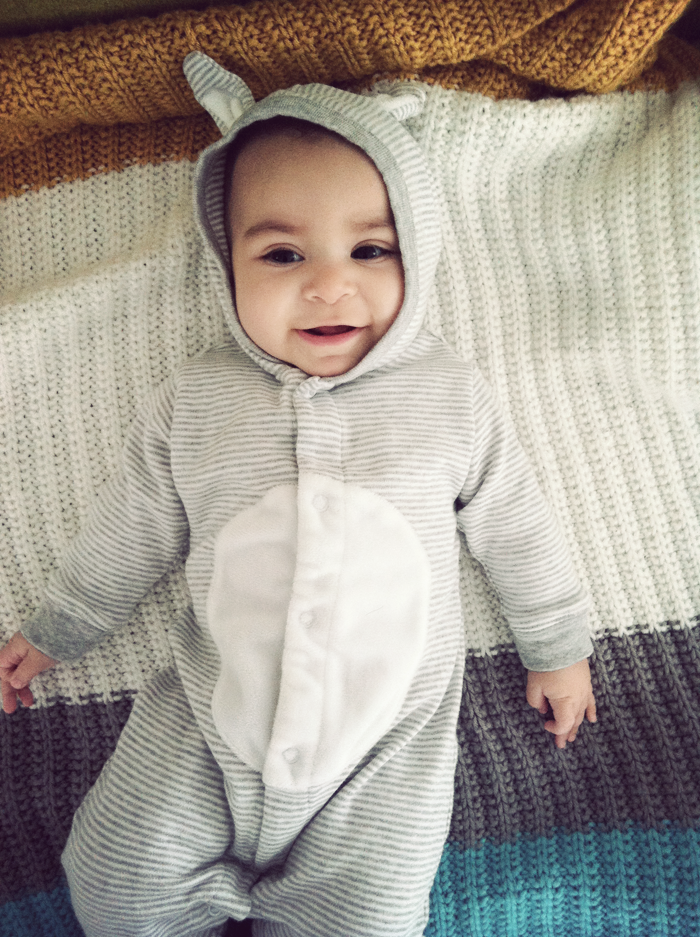
We happened by this outfit for Ellis at Target randomly. It’s supposed to be a rabbit, but I thought it looked close enough to a Totoro costume to warrant its purchase. Plus, it’s just super cute. Target has that ability to lure you in with their low-prices and high-cuteness-factor. It’s a dangerous situation to go into when shopping last minute for a party!
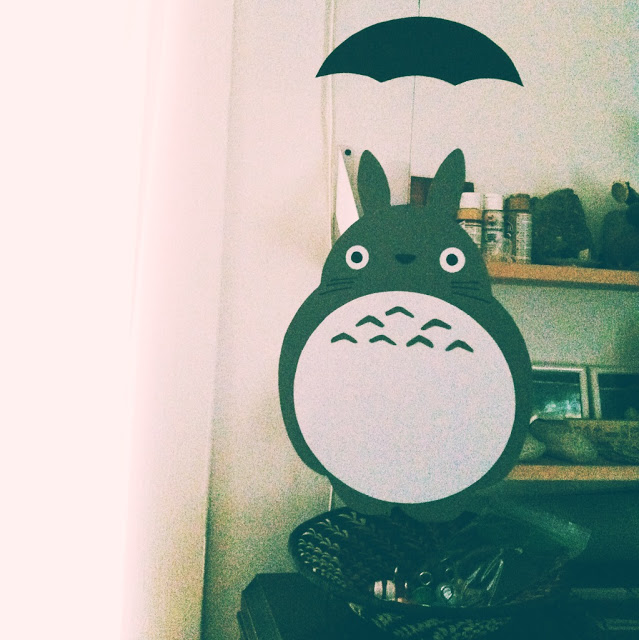
This paper cut mobile was supposed to have three tiers, with Totoro at the top and then the two smaller Totoros (the blue and the white ones) hanging below. However, the pieces for the smaller Totoros were so tiny, there was no way I was going to be able to cut them out within a reasonable amount of time. Mind you, I was working on this around 10pm the night before the party (because I’m nuts.) So I decided to forgo the smaller guys even though the OCD/perfectionist in my brain was giving me hard time. In the end, it still turned out fine.

And a few more shots of the mini-cakes my sister made. You can see some Soot Sprites peeking out here and there. For these, we bought black pompoms and stick-on googly eyes. They were so simple, my 4-year-old niece was able to make them. We had her churning out Soot Sprites at maximum speed! The little pink, orange and aqua flowers are from the dollar aisle in Target. They came as long ribbons, but I just snipped a few strands apart and sprinkled them around. They actually reminded me of the candy the Soot Sprites eat in Spirited Away.

So, that was our joint-birthday Totoro Party, in a nutshell! I can relax for another 5 months until Ellis has her FIRST BIRTHDAY. Yikes. Hers should be extra nuts because she’s a summer birthday! I’ll be sure to “over-do” like I always do, according to Andrew.
xo,
c.
Whew! This past month has been a whirlwind. I just wanted to pop in and say “hi!” because I know I’ve been absent here lately. Work has been super busy and, as per usual, I’ve got my plate full of other fun side projects which haven’t left me with any free minutes to just sit and type. My blog RSS reader is up to over 1000 unread items because I haven’t had time to catch up on my regular reads. First world problems, I know.
The intense work days that start early and end late combined with a lack of sleep have finally caught up to me. Ellis is transitioning into going all night without nursing. She has cried for about 20 minutes somewhere around the hours of 2 or 3am for the past few nights. And Quil is in this terrible phase of only wanting to sleep in our bed and he’s an awful bed mate, forever tossing and turning and kicking. It’s been extra hard since Quil and Ellis share a room and we haven’t yet found a balance of them co-existing in that space without one waking the other. I slept horribly last night and when I did sleep I had nightmares of work projects gone awry. Ugh. So, today I felt rundown and just plain exhausted. 
So, tonight I’ve finally able to just (sort of) relax and write this post and work on a little crafty project: Wood Acorns for our Totoro-themed party this Saturday! Q turned 3-years-old last weekend but this Saturday we’re celebrating all the February/March birthdays in my family – there are five.
I found some little wood eggs at the local craft store that I stained to look like the acorns from Totoro. They still need a few finishing touches, but I’ll post finished pictures when they are done.
If you’ve never seen My Neighbor Totoro, I highly recommend it. Quil loves it, as do Andrew and I.
xo,
c.

As promised, I put together the pattern for the crocheted toy bags that I’ve been making lately. This is the first pattern I’ve written, so bear with me and please let me know if you find any errors or if any of the directions are confusing. (more…)

Like most households with small children, the toy situation seems to get out of control fast. You somehow go from 0 to 1,000,000 toys in only a few short years! They multiply like a wet Mogwai and next thing you know you are constantly stepping on small sharp things and doing a monthly under-the-couch sweep of wayward balls and anything with wheels. You have entire sections of your home devoted to them and somehow they end up everywhere but there. You get so sick of putting things away that you eventually just get a huge bin that you throw everything into only to have your kid dump it out the minute you put the last toy away. Andrew said that one time he intentionally didn’t pick up after Quil just to see what the house would look like in one day. He said by mid-afternoon, it looked like someone had robbed the place. Drawers out, couch cushions overturned, cabinets open!

But one thing we learned with Quil is that he is pretty good about putting things away if each type of toy has its own container and not just one catch-all bin. We started off with just cloth bags that you sometimes get when you buy a pair of shoes. But we only had a couple of those. So I decided to start making some crocheted ones. Now he’s got bags for puzzle pieces, train sets, musical instruments, cars, and he can remember which ones go where for the most part.

Don’t get me wrong. His toys still get everywhere, but it does seem more manageable when everything has a designated bin/bag. I still need to make a few more, but these are super easy to make and work up pretty quick since I crochet three strands at once with a large hook. Check back later this week for a pattern if you are interested in making some for yourself.

***UPDATE***
The pattern is now available here.

xo,
c.

Since the little ones came along, we’ve really been putting effort into creating family traditions for them to look forward to every year. With Ellis being so young, we decided to start with something fun and simple this year – making fingerprint ornaments for us and the Grandparents.

This idea actually came from an ornament that my younger sister, Flora, made at school when she was little. One of my other sisters found it amongst my parents decorations and thought it be fun to make with our own kids. They turned out super cute!

However, these weren’t as easy as we’d hope. I think it mainly had to do with their age. As the kids get older, I imagine it will get easier but it was actually quite difficult to get fingerprints from a 4 month old! Less so from Q, who is rounding on 3 years pretty soon. But still not quite as easy as I’d hoped. Ellis’ hands just kept grasping my fingers and the ink would get everywhere and smear. Quil would just push super hard on the paper so his fingerprints were just blobs! Plus, both their prints are soooo tiny. It was hard to get a clearly defined print. I also think we didn’t use the best ink pad, so the actual pattern from their fingerprints weren’t really distinct.

Next year, we’ll experiment more to find what ink and paper combo works best. But if you want to give it a try, these are the supplies you’ll need:

  • ink pad (washable, non-toxic, child-safe ink) – preferably in a light enough color that you’ll be able to see the lines when you draw on top of the fingerprint. We used a grey.
  • multiple sheets of cardstock – a patterned background sheet is optional
  • wooden drapery rings – you can get these usually at a craft store like Joann Fabrics or Michaels or Hobby Lobby
  • ribbon – thin enough to fit through the eyelets of the drapery rings
  • archival ink pens – I used a Micron .05 pen for the black details, and felt tip pens for the holly
  • glue

We started off by just doing a bunch of fingerprints of each kid all over the sheets of the cardstock. We figured it would just be easier to center them after the fact, rather than try to get the kids to place their fingers perfectly in the center of a small circle. I used Ellis’ thumb since her fingers are microscopic. And Quil used his index finger.

Be sure that you leave enough space around each fingerprint so that it can be mounted onto the drapery ring. This is why I had to use the patterned paper on Ellis’ portrait. I accidentally had the particular fingerprint I wanted to use too close to one of the others. This resulted in a paper circle not big enough to mount on the drapery ring. To remedy this, I cut out around the fingerprint I wanted to use and, with a mounting square, affixed it to a larger circle cut from the decorative paper. I then mounted that larger circle onto the drapery ring.

After the fingerprints were dry, we chose the best ones and used this book as inspiration for drawing creatures. I chose the snail for Ellis and an owl for Quil. I also did simple portraits of each of the kids with their respective prints.

Cut around your drawing making sure it’s big enough to glue onto the drapery ring. We then wrote the kids’ names on the back with the year, applied glue around the front edge of your circle, then attached it to the drapery ring. Add your ribbon and you’re done! Here are all of ours:

We hope to do this with them every year and eventually have them do the drawings themselves. I probably will look forward to this tradition more than they will!

-c.

Living in an old farmhouse has its charms, but freezing cold floors is not one of them. However, this can easily be remedied with super cute slippers!

IMG_6777

I crocheted and felted these for Quil and Ellis (though cold floors are the least of her concerns) for these chilly months that are upon us. Last year, we got Quil a pair from H&M that worked well enough but I decided to make them this year after seeing this pattern on Ravelry.

You can purchase the Easy Felted Crochet Kids Slippers by Sarah Lora pattern on Ravelry for only $3.50. It comes with directions for sizes Newborn to 4T and directions on felting and making the slippers non-skid.

IMG_6928

Q wears around a toddler size 7-8 shoe and I made the medium-sized slipper. They fit but still have some room to grow over the winter months. The non-skid works great on our hardwood floors. Ellis’ are still pretty big even though I made the newborn size. Luckily for her, Andrew’s brother’s wife made an adorable knit pair that will fit until she grows into the ones I made.

IMG_6769

IMG_6781

I used Cascade Ecological Wool yarn in Natural and Silver and they felted up beautifully.

If anyone else decides to make a pair, I’d love to see photos!

**Update**
I eventually had to cover the puffy paint soles with suede as a more permanent non-slip solution. I found that with our hardwood, the puffy paint would get dusty and eventually harden up and become slippery again. I would occasionally wipe them down and the stick would return for a short time, but the leather seems to work much better (though a bit hard on the fingers to have to sew through! Excuse the terrible color of the photo below. Bad lighting!)

2013-09-08 21.51.28 copy