Crystal Madrilejos

Design & Creative

If you have lots of little humans in your life, legwarmers are great gifts that work up quick, and are fun and unique. When I first started knitting and crocheting, like most beginners, I didn’t work much outside the realm of scarves. They are simple and easy, but there are only so many winter scarves a person needs. However, legwarmers are a little out of the ordinary unless you are a dancer. And there are so many different ways styles and patterns you can make, but they still look cool and work well when they are really simple.

(more…)

Ever since the babies started arriving in our family almost 13 years ago, Andrew and I have been hand-making gifts for the holiday. It’s something we enjoy doing because we like to be able to make things that are really personal and specific to their personality and interest. But also, we like that it’s not something that they can go out and buy themselves. In the coming weeks, I’m going to highlight some projects we’ve made in the past in case you want to give them a try yourself. (more…)

As promised, I put together the pattern for the crocheted toy bags that I’ve been making lately. This is the first pattern I’ve written, so bear with me and please let me know if you find any errors or if any of the directions are confusing. (more…)

Like most households with small children, the toy situation seems to get out of control fast. You somehow go from 0 to 1,000,000 toys in only a few short years! They multiply like a wet Mogwai and next thing you know you are constantly stepping on small sharp things and doing a monthly under-the-couch sweep of wayward balls and anything with wheels. You have entire sections of your home devoted to them and somehow they end up everywhere but there. You get so sick of putting things away that you eventually just get a huge bin that you throw everything into only to have your kid dump it out the minute you put the last toy away. Andrew said that one time he intentionally didn’t pick up after Quil just to see what the house would look like in one day. He said by mid-afternoon, it looked like someone had robbed the place. Drawers out, couch cushions overturned, cabinets open!

But one thing we learned with Quil is that he is pretty good about putting things away if each type of toy has its own container and not just one catch-all bin. We started off with just cloth bags that you sometimes get when you buy a pair of shoes. But we only had a couple of those. So I decided to start making some crocheted ones. Now he’s got bags for puzzle pieces, train sets, musical instruments, cars, and he can remember which ones go where for the most part.

Don’t get me wrong. His toys still get everywhere, but it does seem more manageable when everything has a designated bin/bag. I still need to make a few more, but these are super easy to make and work up pretty quick since I crochet three strands at once with a large hook. Check back later this week for a pattern if you are interested in making some for yourself.

***UPDATE***
The pattern is now available here.

xo,
c.

Living in an old farmhouse has its charms, but freezing cold floors is not one of them. However, this can easily be remedied with super cute slippers!

IMG_6777

I crocheted and felted these for Quil and Ellis (though cold floors are the least of her concerns) for these chilly months that are upon us. Last year, we got Quil a pair from H&M that worked well enough but I decided to make them this year after seeing this pattern on Ravelry.

You can purchase the Easy Felted Crochet Kids Slippers by Sarah Lora pattern on Ravelry for only $3.50. It comes with directions for sizes Newborn to 4T and directions on felting and making the slippers non-skid.

IMG_6928

Q wears around a toddler size 7-8 shoe and I made the medium-sized slipper. They fit but still have some room to grow over the winter months. The non-skid works great on our hardwood floors. Ellis’ are still pretty big even though I made the newborn size. Luckily for her, Andrew’s brother’s wife made an adorable knit pair that will fit until she grows into the ones I made.

IMG_6769

IMG_6781

I used Cascade Ecological Wool yarn in Natural and Silver and they felted up beautifully.

If anyone else decides to make a pair, I’d love to see photos!

**Update**
I eventually had to cover the puffy paint soles with suede as a more permanent non-slip solution. I found that with our hardwood, the puffy paint would get dusty and eventually harden up and become slippery again. I would occasionally wipe them down and the stick would return for a short time, but the leather seems to work much better (though a bit hard on the fingers to have to sew through! Excuse the terrible color of the photo below. Bad lighting!)

2013-09-08 21.51.28 copy

I started this jumper back in 2010 when I was pregnant with Quil and didn’t get around to finishing it until a couple months before Ellis was born (2 years later -yikes!) I used the Tutu Onesy and Hat – Crochet pattern, sans the hat, by Lion Brand that I found on Ravelry. The pattern is sized for an 18-month old, but I modified it so that it would be for a newborn.

Ellis is about 3 and a half weeks old and it fits like a glove. I initially brought it to the hospital thinking she could wear it home, but it was still too big. Luckily, I tried it on her a couple days ago for the first time. Had I waited much longer, she might not have fit!
I used black Lion Brand Microspun yarn instead of the multi-color stripes in the pattern photo and removed the little skirt/ruffle thingy since I didn’t know if I was having a boy or a girl when I was pregnant with Q. Honestly, I probably would have removed the ruffle anyway because I’m not a fan of it to begin with. Also, I added snaps in the crotch area for easy access when changing baby’s diaper because it would be a pain in the butt to have to take this entire thing off every time.

Look at that cutie! If anyone else makes one, send me a photo! I would love to see :)

-c.

While we’re waiting, waiting, waiting for Baby Girl to arrive, I’ve been doing what is normal for anyone who is mega-preggers – taking on huge projects that are made infinitely more difficult by my huge belly and constant body pains. That’s normal, right? Right?!

So, my current obsession and project in the works: crocheted rag rugs! We’ve been in the process of fixing up the kids’ room – which I hope to post about soon – and one of the rugs we have in their room is just too big, in my opinion. So, of course, I decided to make a new one. You know, before the baby comes. Ha!

I was trolling Ravelry (if you are a knitter or crocheter and aren’t on Ravelry, do yourself a favor and check it out now!) and came across this amazing crocheted Calico Rag Rug by Gillian Hamilton which inspired me to give it a shot. I did a little more research and also came across King Soleil which has a whole page dedicated to her process of creating rag rugs and tips and tricks she’s learned through her experience. She mainly uses upcycled materials, which really appeals to me since the amount of material it takes to make one rug can get pricey. I’m thinking a thrift store run is in order!

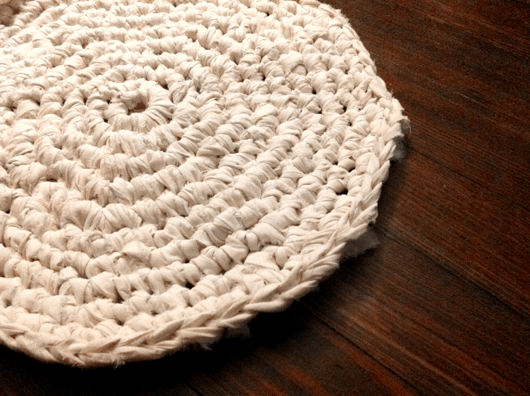
However, this current one that I’m working on (pictured above) is made from muslin that I purchased at the local fabric store. Basically all you have to do is find any sort of woven material you want, cut it into long strips and start crocheting in a circle and, Voila! you have a rug!

So far my rug is about 2 feet in diameter and there are few things I’ve learned:

l. Crocheting on a large scale is a workout. Think less wrist movement and more entire arm movement. Multiple times I’ve had to ask Andrew, “Is it hot in here?” Nope, just doing my crochet workout.

2. Working with such large pieces of fabric yarn requires the largest crochet hook I’ve ever seen. It’s obscenely large and slightly embarrassing. The hook I’m using for this particular rug is a 15mm – Q hook.

3. I’m a pretty experienced crocheter and I still had some problems with the rug getting wonky and wavy. I’m still not exactly sure why this was happening but with some minor adjusting I was able to straighten it out and it seems to be back on track.

I will post more pictures when the rug is done, which hopefully will be sooner than later.

-c.

As promised, I whipped up this tutorial for the ponchos I posted about a couple weeks ago. This is my first tutorial, so bear with me. Writing tutorials is hard work. Especially when I could only work on it for mere minutes at a time. I’m hoping that I don’t confuse anyone with my directions.

Granny Square Poncho Tutorial
Materials: Yarn, Crochet hook, embroidery needle and safety pins
Step 1: Crochet four Granny Squares of equal size. If you aren’t familiar with how a Granny Square is made, read Purl Bee’s tutorial on the Classic Granny Square Pattern.

The size of the poncho is going to depend on the size Granny Square you make. The diagonal measurement of the square equals the length of the poncho from neck opening to the bottom of the poncho point, like so:

Step 2: When you’ve completed your squares (i’m sure they look lovely), arrange the squares according to this diagram and attach edges together using safety pins.

Step 3: Using an embroidery needle and yarn, begin sewing together sides. Remove safety pins as you go.

(Optional) Step 4: To create a smaller neck opening or to build up a little bit of a cowl neckline: Single crochet around the neck opening to the desired height. Done!

If you have any questions, feel free to comment of email me directly. I’m not sure such a simple project warranted such a lengthy explanation, but oh well! You’re welcome! :)

I also spent some minutes putting together a printable version of this tutorial, you know, just in case you’re like me and have binders full of project ideas that I never get around to doing. (Though, I really hope you try this one and tell me how it goes. Oh! And send pictures of your creations too!)

Download the Granny Square Poncho Tutorial here.

Enjoy!
– c.

P.S. Just one last thing before I let you get crafting, this pattern is for personal use only. Please don’t sell this pattern or any project made from this pattern. Feel free to share this and make as many as you please for everyone you know, BUT please please don’t sell them.  Thank you!

I figured I’d post about a couple Christmas gifts I made this past year. This weather is crazy. But I guess I shouldn’t expect anything different since it’s Ohio and we go through this every year.

I realize Christmas is long over. Maybe next year I will post in a more timely manner. But I won’t hold my breath. Anyways! On to gifts!

Many many years ago, a friend and I started crocheting together and we went through a phase of making granny squares. Our grand plan was to make a ton of squares, and through our combined effort, a blanket of granny squares for each of us. Long story short, this didn’t happen and all these years I’ve been holding onto these squares. Until this past Christmas when I found the perfect use! Little ponchos!!!

Those little ladies are two of my nieces. They are both around 2 years old and the ponchos fit great! Basically, I took 4 granny squares and sewed them edge to edge. They were super simple to make. Look for a tutorial to this little poncho in the near future!

-c.


Remember this sweater I made when I was pregnant? Quil wore it on his first outing to his Lolo and Lola’s for his Cousin Layla’s 1st birthday party.

He was so tiny!

-c.