Crystal Madrilejos

Design & Creative

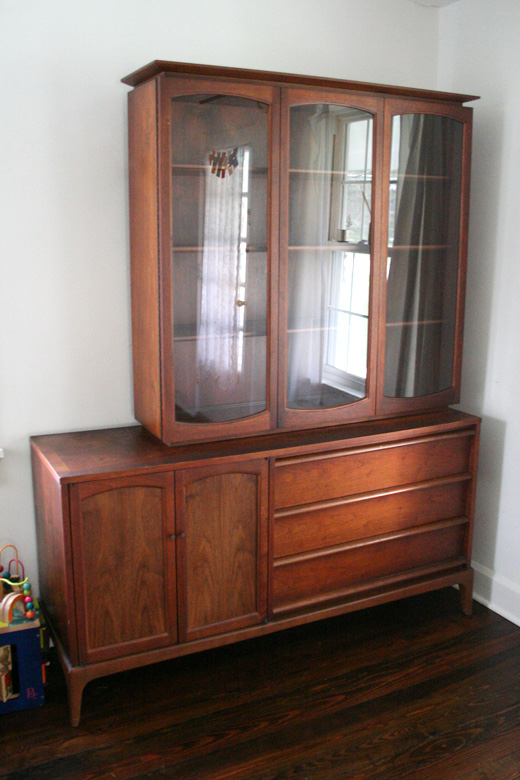
Does anyone know what this piece of furniture is called? A china cabinet? A hutch?

Whatever it’s called, it’s awesome and beautiful and it was Andrew’s surprise early-Mother’s Day gift to me!

This past weekend we went on a little thrifting trip and came across this china cabinet (that’s what I’ll call it for now until someone corrects me) at a local thrift store that is usually hit or miss. This particular store can sometimes look like those hoarder houses on A&E, but they usually have really good prices on large items. So much so that I am willing to look past the old lady who chain-smokes and the cat in the corner giving birth (no joke).

We saw this china cabinet and we both really liked it, but it wouldn’t fit in our car. So we had to pass on it. The minute we left I knew we were passing up on something good, but there wasn’t anything we could do! I was feeling some serious non-buyers remorse. Is there such a thing?

Anyway, Monday I come home from work and it’s in our living room. Andrew had gone back with his Dad’s truck and got it for me! What a guy!

We’re still unsure of what our plans are for it, but you can be sure I’ll be posting about it again soon.

-c.

My Mom just came back from a 5-month trip to the Philippines. (Welcome home Mom!)

As per usual, she came bearing gifts from abroad and these two beauties were amongst them. She has a small obsession with Sake sets. I don’t think she actually enjoys drinking it, but she sure does love collecting those little cups with matching pitchers. Pitchers? That can’t be the correct term.

-c.


Quil is approaching 8 months-old! I can’t believe how fast these past months have gone. I looked back at the pictures we’ve taken of him and realize there are so many baby projects that we never revisited after Q was born.

The co-sleeper is still attached to our bed and now that Q is sleeping in his crib (another project we never posted about!) I’ve gone back to using the co-sleeper as my nightstand. He slept in the co-sleeper for about two months before he grew out of it. One thing we learned—the wool side extenders weren’t necessary. They looked nice, but we ended up taking them out. He moved so little at that age and the co-sleeper was so close to the wall, there really wasn’t any possibility of him rolling out.


Here he is being cute! He slept on a Sassy Vented Sleeper Wedge (which I hear now is a no-no!) because he had reflux and having him on a incline helped.

–c.

As Crystal mentioned in the previous post, the basic idea was adapted from the “Culla Belly” design. The main difference is the overall height of the co-sleeper. If you notice in the picture of the “Culla Belly” co-sleeper, the mattress it’s designed for is exceptionally thin. Ours is a “normal” mattress and is much thicker so the sides of the co-sleeper had to be a lot taller.

In essence, it’s a three-sided box with a “shelf” halfway up where the baby lies. The whole thing is attached to a frame underneath that extends far under the mattress keeping it in place. It’s quite secure but just for added strength we bolted it to the pallets that our bed sits on.

I did a lot of research on the toxicity of different types of wood and decided to use Poplar. Pretty much all of the basic wood types you would find at a lumber yard are perfectly safe, with the most common irritant being the dust produced from cutting and sanding. I’m also using Poplar for the crib, which is currently under construction. It’s a nice, easy to find, and not too expensive hardwood.

A lot of cribs these days are made out of different types of plywood and even MDF, which contain all sorts of industrial glues and even formaldehyde, so I knew I wanted to avoid those at all cost.

The next consideration was how to finish the co-sleeper. I decided to make my own finish instead of worrying about paints and stains and any kind of hard finish. To make the finish I heated up mineral oil – which is used on cutting boards and wooden utensils and is essentially unscented baby oil – and added some fragrance-free beeswax until it melted. (I bought the beeswax at A.I. Root here in town. Did you know that Medina, OH is The Bee Capital of the World? Well, you do now.) Then you let it cool and you rub on the paste that results (below). It’s completely food-safe and non-toxic.

My only worry in all of this is that Crystal’s not going to want to give up her new bedside space. (She’s currently using the co-sleeper as a side table and keeps her contacts, alarm clock, books, glasses, yarn, water bottle, tissues, hair ties, crocheting/knitting needles, and whatever else she manages to take to bed with her.)

-a.

Uncategorized

Co-Sleeper

A lot of the projects that we post on here are either made by myself or by Andrew but this project was a cooperative effort between the two of us: a co-sleeper for the baby.

We decided to go the co-sleeper route for the first few months while I’m on maternity leave. If you’re unfamiliar with what a co-sleeper is, you can learn more here. It is basically a 3-sided bassinet that attaches to the side of the bed. They come in all different types and sizes. Since I will be nursing, we figured it would be easier to have the baby there next to me rather than me getting out of bed every two hours to go into the other room. BUT at the same time, not have the baby IN the bed with us.

Most co-sleepers on the market are big bulky things that involve many parts and can convert into other things like a free standing crib or a playpen. We wanted something really simple made from basic materials. With inspiration from this “Culla Belly” prototype we saw on swissmiss we made our own version.

I’ll let Andrew embellish more on the actual construction since he was responsible for that part. The parts I was responsible for were the wool felted sides, the mattress, and the mattress cover. Remember way back when I posted about making big pieces of felted alpaca wool? Well, this is what those were for. We knew we wanted felt sides but didn’t want to throw down the cash for industrial wool that would hold its shape on its own. So we improvised.

Here are the sides: They are made from are felt sewn around pieces of heavy cardboard and then sewn together.

The mattress: I sewed together remnants from the sides and layered them between two pieces of the alpaca felt.

The mattress cover: I crocheted a wool mattress cover just in case the baby springs a leak. I doubled the yarn while crocheting to make sure it was nice and dense (I used Lion’s Brand Fisherman’s Wool in Nature’s Brown) then felted it in the washing machine. If baby has an accident I can just throw the cover in the wash and not worry about washing the whole mattress.

Currently, I’m working on making little sheets but right now we just used a pillow case that fits surprisingly well. Check back soon for a post from Andrew on the construction.

–c.

Generation 2.0 isn’t a total overhaul, just a tweak. In version 1.0, I made it to accommodate rectangular tissue boxes. But it turns out that because of the way the tissues are layered in the box it doesn’t work too well to pull them out upside down. They tore. So this one was made for square tissues boxes and it works much, much better since the tissues are layered and folded inside the box. It was made for our friend Michael C.

-a.

Uncategorized

I Love My Family

I saw this over at “design is mine: isn’t it lovely?” and was completely blown away. Love everything about it and think it would be a perfect addition to the baby’s room.

Here is a detail.

–c.

There seems to be a void in the world of tissue box design. For whatever reason, the patterns that adorn boxes of facial tissue are inevitably horrible. And this isn’t a new revelation. Grandmothers across the globe have been crocheting tissue box covers for years now and others have come up with even more impressive solutions. For example, one of my favorite remedies does away with the box altogether:


Since Crystal and I battle the occasional allergen and we have boxes of tissues throughout the house I wanted to try and ease our eyes from the patterned hell. I focused on our bedroom where end table space is limited and access can be a problem. Here was my “solution”:

-a.

Ever since we cleaned out our barn for use as a woodshop we’ve (Crystal, Crystal’s bro Tomas J., and I) have been collecting “stuff” that we feel could be used for something in the future. I’m always happy when I actually get to use this “stuff.” It makes me feel like I’m breathing new life into something, and I’m not just a hoarder. Over the past few weeks I’ve been working on a little outdoor coffee table of sorts for my parents that utilized some of what we’ve collected. My folks have a seating area on their porch and needed a table to accompany a bench my Mama recently painted. So I scoured the barn and put a table together with materials that all had former lives at one time.

1-2) For the frame I used an old rusty, musty thing we found in Crystal’s parents’ backyard. After some of my elbow grease removed and sealed the metal from future rust it turned out pretty good.
3) The majority of the tabletop was this piece of wood. I’m assuming it’s pine. When in doubt, just say it’s pine. This picture is of a leftover section.
4) The board in image 3 wasn’t quite wide enough so Tomas J. and I cut it in half and added a strip from a scrap piece of 4×4 in the middle. Again, the pictured piece was leftover from one of the ends I cut off. To finish the top I put end caps on each end to hide the ugly end grain. (The word “end” made up 17.6% of that sentence.)

Below is the finished product.

-a.

Uncategorized

Puzzle Box

Baby Layla has been the focus of yes, have some. lately, as is evident here, here and here. The latest gift for the little one is this Puzzle Box I made. At this point, six of her could fit into one of the small compartments, but she’ll grow into it. And until it’s filled with her toys, I’m sure Mama and Papa can use it for blankets, or clothes, or any of the other large amounts of “supplies” that little, tiny humans require.

–a.