Crystal Madrilejos

Design & Creative

Here are the last two installments of Q’s first year in video! Awhile back, after making a video of his first three months, we decided to do a video recap every three months for the first year to document his cuteness. And also as a reminder for when he is 16 and full of angst that for a brief moment he was our baby boy who needed us and wanted to hang out with us and wasn’t embarrassed by our weirdness.

Music: “Slow Dance” by Art Sorority for Girls

And here he is being all big and stuff.

Q: 9-12 Months from Crystal Madrilejos on Vimeo.

Music: “Go Outside” by Cults

If you haven’t seen the first two, you can view Q: 0-3 Months here, and Q: 3-6 Months here. Enjoy!

-c.

They weren’t kidding with the whole “April Showers” bit, were they? Yesterday was quite horrible. Walking to my car after work, I was almost that person with the inside-out umbrella. I definitely was that person who wore the wrong shoes and had silt and all matter of disgusting things washing over the sides of my ballet flats. So much so that I looked like I had hobo feet by the time I got in my car. Anyway!

Thanks to our good friend Rachel, this boy can now weather all types of… weather! Isn’t this raincoat awesome? It is a hand-me-down from our friend Rachel’s little boy (who is now getting to be a big boy) and was sent to us when Q was a wee one.  I remember thinking “it’ll be years before he fits in this!” What the heck? When did our baby boy become a little boy with little boy things like raincoats and jeans? Sheesh.

-c.

This hoodie was another great find from the Kids Garage Sale I posted about the other week. Elbow patches? Hell yes.

Q is modeling his new look in front of our Tetris screen door.

-c.

This is what mornings look like around here with the weather getting warm. Come ON warm weather! Baby boy can’t wait to run around the yard half-naked.
-c.

As promised, I whipped up this tutorial for the ponchos I posted about a couple weeks ago. This is my first tutorial, so bear with me. Writing tutorials is hard work. Especially when I could only work on it for mere minutes at a time. I’m hoping that I don’t confuse anyone with my directions.

Granny Square Poncho Tutorial
Materials: Yarn, Crochet hook, embroidery needle and safety pins
Step 1: Crochet four Granny Squares of equal size. If you aren’t familiar with how a Granny Square is made, read Purl Bee’s tutorial on the Classic Granny Square Pattern.

The size of the poncho is going to depend on the size Granny Square you make. The diagonal measurement of the square equals the length of the poncho from neck opening to the bottom of the poncho point, like so:

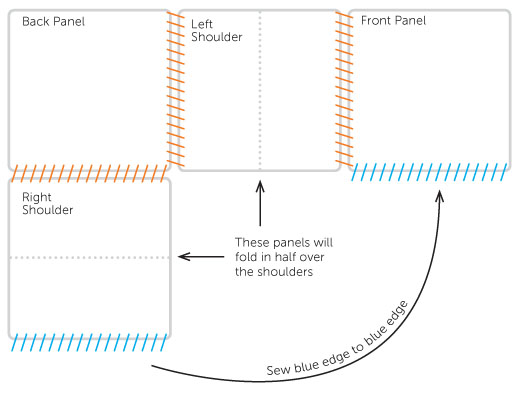
Step 2: When you’ve completed your squares (i’m sure they look lovely), arrange the squares according to this diagram and attach edges together using safety pins.

Step 3: Using an embroidery needle and yarn, begin sewing together sides. Remove safety pins as you go.

(Optional) Step 4: To create a smaller neck opening or to build up a little bit of a cowl neckline: Single crochet around the neck opening to the desired height. Done!

If you have any questions, feel free to comment of email me directly. I’m not sure such a simple project warranted such a lengthy explanation, but oh well! You’re welcome! :)

I also spent some minutes putting together a printable version of this tutorial, you know, just in case you’re like me and have binders full of project ideas that I never get around to doing. (Though, I really hope you try this one and tell me how it goes. Oh! And send pictures of your creations too!)

Download the Granny Square Poncho Tutorial here.

Enjoy!
– c.

P.S. Just one last thing before I let you get crafting, this pattern is for personal use only. Please don’t sell this pattern or any project made from this pattern. Feel free to share this and make as many as you please for everyone you know, BUT please please don’t sell them.  Thank you!

The weather this weekend was beautiful. We took a walk in the fields and woods looking for this summer’s camping site and Quil gave spring a warm welcome!

Hooray for Spring!

-c.

I think we paid $1 for this cuteness. (The jacket, not the boy.)

Last weekend we attended the bi-annual Kids Garage Sale at our local rec center. Twice a year you can browse, garage-sale style, an ungodly amount of baby and kid stuff all under one roof. Most of the stuff is a really great deal, especially if you hit it up towards the end. People are practically giving the stuff away just to get it out of their house! Though I have to admit, it’s a bit overwhelming. If you go with a purpose, it’s a lot easier to manage. This was our second time going and I think we made out pretty well. We got a few great outfits for Q and I think we spent less than $10 total. How awesome is this?

There are other items, but I haven’t had a chance to photograph them. But I will at some point. The cuteness is extreme around here.

-c.

Early Bath 1956
Image by Smabs Sputzer via Flickr

Does anyone else have only a shower stall in their house? Has anyone else wanted to pull their hair out trying to bathe a one-year-old in a shower stall? Am I alone in my frustration with bath time?

After Q grew out of his baby bath tub we tried a few different things that worked with varying levels of success. Mostly low levels of success. We’ve tried the kitchen sink, our modified galvanized tub bathroom sink, a blow up ducky bathtub, and our recent incarnation of a bathtub being a big plastic flex tub/bucket from Target. Here are my issues:

Kitchen Sink: Too much water everywhere! Dude likes to splash and trying to rinse his hair with minimal spraying outside the sink area is nearly impossible.

Bathroom Sink: We have an unusual bathroom sink. It’s pretty much a round galvanized tub that we converted into a sink so it’s deep enough for him to bathe in. The splashing is a factor again here too especially since there is an electrical outlet right below the sink (don’t ask). Spraying is not an issue, since there is no sprayer which sucks just as much.

Blow Up Ducky Tub: This worked okay for a little while and is great if you are traveling. We took it with us to NYC with us when Q was about 7 months old. But he’s grown too big for it.

Plastic Flex Tub: This is what we are currently using and Q seems to like sitting in the brightly colored tub. But there’s no drainage so it’s basically the worst thing ever when you want to empty the water before rinsing.

Another frustrating thing about bath time is that Q seems to have an aversion to standing while bathing so it’s hard to get him rinsed well. He’ll only stand during a bath if I’m holding him up even though he is fully capable of standing on his own. This is also another reason we haven’t yet tried to just bathe him directly in the shower stall. We try to clean our shower often, but we still don’t feel comfortable with him sitting directly on the shower floor. I know there is a simple solution to this problem but it’s evading me with all it’s might.

How do you get a one-year old to stand during bath time? Is a thorough rinse even that important? What if he peed in the water? Am I over-analyzing this?

Anyone have a solution to this nonsense?

-c.

Q’s first birthday party was almost a month ago and I’m finally getting around to posting pictures. Some of you may have read my inspiration post where I was debating on the details of the big day. Well, we went with the “lots of balloons and streamers” idea in the end. It just seemed right. I love me some themed parties with fun details and cute favors for all the kids but since we decided to go all out and invite all our friends and families it seemed like doing a theme might be too much.

We had the party at Andrew’s parent’s house because our house is teeny tiny. We decided to only decorate the dining room since that was where he would be blowing out his candle.

All in all, I think we hung up more than 1000 ft. of streamers and about 100 balloons. I really thought 100 balloons would cover more area, but I’m really bad at judging such things.

We used a combination of Q’s toys and old toys from Andrew’s childhood as a center piece for the dining room table and as ways to prop up the cake stands to different levels. My sister made all the cupcakes (except for Q’s cupcake, Andrew made that. Maybe he’ll write about it in a future post. At least, I’m hoping he will).

This guy is helping set up the decorations with his handy dandy lifter. This was Andrew’s little set up.

Overall, I deemed it a success!

-c.

Today Q bit me harder than he (well anyone for that matter) has ever bit me. We were playing outside, enjoying today’s nice weather. He was playing in gravel and like most little kids, he puts a handful of small stones in his mouth. As I’m trying to swipe them out, he bites down on my index finger really hard, increasing pressure slightly with every second! He was unrelenting and I was actually sort of yelling to stop while Andrew, my sister, my brother and brother-in-law stood there in disbelief. I started to squeeze his cheeks hoping that it would distract him to stop, but he just kept biting harder. For a second, I was scared he was going to break the skin. Luckily, he let go and ended up leaving bruises and tiny, deep teeth indents. He’s been in this phase lately of biting and I know it’s normal at this age. But I can’t deny that it’s annoying as hell! And sort of scary at times.