
As promised, I put together the pattern for the crocheted toy bags that I’ve been making lately. This is the first pattern I’ve written, so bear with me and please let me know if you find any errors or if any of the directions are confusing. (more…)
As promised, I put together the pattern for the crocheted toy bags that I’ve been making lately. This is the first pattern I’ve written, so bear with me and please let me know if you find any errors or if any of the directions are confusing. (more…)

Since the little ones came along, we’ve really been putting effort into creating family traditions for them to look forward to every year. With Ellis being so young, we decided to start with something fun and simple this year – making fingerprint ornaments for us and the Grandparents.
This idea actually came from an ornament that my younger sister, Flora, made at school when she was little. One of my other sisters found it amongst my parents decorations and thought it be fun to make with our own kids. They turned out super cute!
However, these weren’t as easy as we’d hope. I think it mainly had to do with their age. As the kids get older, I imagine it will get easier but it was actually quite difficult to get fingerprints from a 4 month old! Less so from Q, who is rounding on 3 years pretty soon. But still not quite as easy as I’d hoped. Ellis’ hands just kept grasping my fingers and the ink would get everywhere and smear. Quil would just push super hard on the paper so his fingerprints were just blobs! Plus, both their prints are soooo tiny. It was hard to get a clearly defined print. I also think we didn’t use the best ink pad, so the actual pattern from their fingerprints weren’t really distinct.
Next year, we’ll experiment more to find what ink and paper combo works best. But if you want to give it a try, these are the supplies you’ll need:
We started off by just doing a bunch of fingerprints of each kid all over the sheets of the cardstock. We figured it would just be easier to center them after the fact, rather than try to get the kids to place their fingers perfectly in the center of a small circle. I used Ellis’ thumb since her fingers are microscopic. And Quil used his index finger.
Be sure that you leave enough space around each fingerprint so that it can be mounted onto the drapery ring. This is why I had to use the patterned paper on Ellis’ portrait. I accidentally had the particular fingerprint I wanted to use too close to one of the others. This resulted in a paper circle not big enough to mount on the drapery ring. To remedy this, I cut out around the fingerprint I wanted to use and, with a mounting square, affixed it to a larger circle cut from the decorative paper. I then mounted that larger circle onto the drapery ring.
After the fingerprints were dry, we chose the best ones and used this book as inspiration for drawing creatures. I chose the snail for Ellis and an owl for Quil. I also did simple portraits of each of the kids with their respective prints.
Cut around your drawing making sure it’s big enough to glue onto the drapery ring. We then wrote the kids’ names on the back with the year, applied glue around the front edge of your circle, then attached it to the drapery ring. Add your ribbon and you’re done! Here are all of ours:


We hope to do this with them every year and eventually have them do the drawings themselves. I probably will look forward to this tradition more than they will!
-c.

As promised, I whipped up this tutorial for the ponchos I posted about a couple weeks ago. This is my first tutorial, so bear with me. Writing tutorials is hard work. Especially when I could only work on it for mere minutes at a time. I’m hoping that I don’t confuse anyone with my directions.
Granny Square Poncho Tutorial
Materials: Yarn, Crochet hook, embroidery needle and safety pins
Step 1: Crochet four Granny Squares of equal size. If you aren’t familiar with how a Granny Square is made, read Purl Bee’s tutorial on the Classic Granny Square Pattern.
The size of the poncho is going to depend on the size Granny Square you make. The diagonal measurement of the square equals the length of the poncho from neck opening to the bottom of the poncho point, like so:

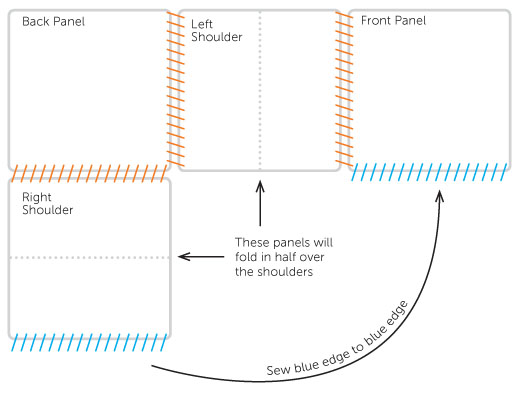
Step 2: When you’ve completed your squares (i’m sure they look lovely), arrange the squares according to this diagram and attach edges together using safety pins.
Step 3: Using an embroidery needle and yarn, begin sewing together sides. Remove safety pins as you go.
(Optional) Step 4: To create a smaller neck opening or to build up a little bit of a cowl neckline: Single crochet around the neck opening to the desired height. Done!
If you have any questions, feel free to comment of email me directly. I’m not sure such a simple project warranted such a lengthy explanation, but oh well! You’re welcome! :)
I also spent some minutes putting together a printable version of this tutorial, you know, just in case you’re like me and have binders full of project ideas that I never get around to doing. (Though, I really hope you try this one and tell me how it goes. Oh! And send pictures of your creations too!)
Download the Granny Square Poncho Tutorial here.
Enjoy!
– c.
P.S. Just one last thing before I let you get crafting, this pattern is for personal use only. Please don’t sell this pattern or any project made from this pattern. Feel free to share this and make as many as you please for everyone you know, BUT please please don’t sell them. Thank you!