Crystal Madrilejos

Design & Creative

On Being, Uncategorized

Free Time

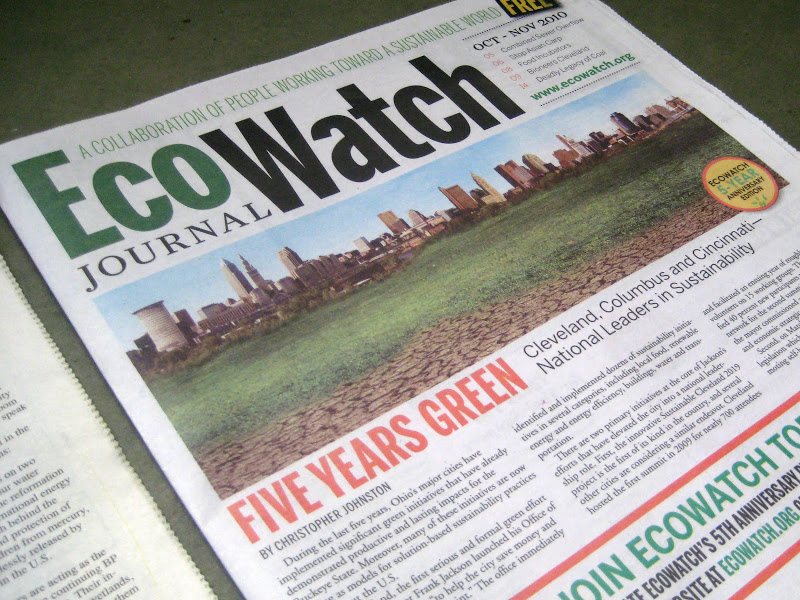
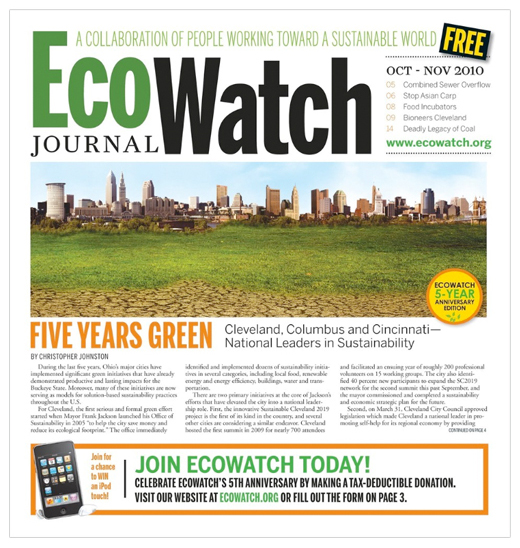
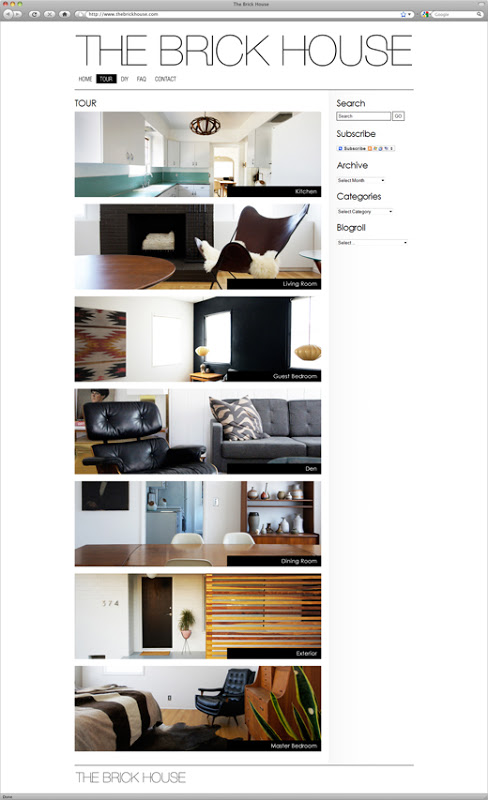
Can I just say I LOVE The Brick House?

Lately, this blog I found via notMartha has been consuming any free moment I have. It’s been my latest obsession and I’ve been not-so-secretly stalking this blog and reading all the archives. Not only is it complete eye-candy, but eye-candy delivered hilariously through the blog creator Morgan Satterfield.

In 2008, Morgan and her husband bought a mid-century brick home in Southern California with the intention of doing much of the renovation themselves. Morgan started the blog to document their renovation process but it has evolved into a full-fledged online shelter design resource. Not only that. She’s into thrifting. I mean, really into it. But the rub is, she can’t spend more than $100 on any one item. Though sometimes she does break this rule.

Renovations? Thrifting? Mid-century Danish design? Oh, let me count the ways… This is a girl after my own heart!

-c.

Uncategorized

EcoWatch


I’m super excited to share a new project! At work, I’ve been fortunate to collaborate on the redesign of EcoWatch Journal.

EcoWatch is an Ohio based non-profit organization that focuses on sustainable lifestyle, business practices and policies. EcoWatch Journal is published bi-monthly and distributed throughout Ohio.

Stefanie Penn-Spear is the Executive Director and has been handling the unbelievable task of directing and designing EcoWatch Journal in the past. With the fifth anniversary of EcoWatch on the horizon, Wise Group decided to help Stefanie out and give the Journal a new look. Here is fully redesigned cover:


Click here to read a digital version of the current issue or to see previous issues.

-c.

I mentioned this little project of ours a little while back. Now that football season is in full swing, I thought it would be appropriate to share our new site. Andrew had the idea for these shirts a long time ago but we never had the means to have them made. While we were living in NYC, we screen printed some prototypes ourselves which worked well enough to print a few. Finally, we had shirts professionally printed and they are available here. Women’s sizes are currently being printed and will be up for sale soon!

-c.

Uncategorized

The City Pool

One of our newer endeavors, The City Pool has been a long time coming. It’s really Andrew’s baby, but I’ve been helping him out. If you are into sports, Ohio, and t-shirts please check out our new store.

-c.

Uncategorized

Mom’s

My Mom’s birthday is this Friday. I made this collage for her party invite. I don’t know why, but collages have been my fun-design-project of choice lately.

My Mom has so many great photos, it was hard to choose which to use. Happy Birthday Mom!

-c.

Being one of the two graphic designers in the family (my brother, Tom, is also a designer. Check out his work here. It’s really great.), my computer skills are called upon pretty regularly to design invites for all types of occasions. My Mom’s 66th birthday is this month and I’ve been asked to do the invitation for her party. Over the years, I’ve found that designing invitations for my family can be a fun way to play around and do all the crazy things I normally can’t do when it comes to client work. It’s also a good way to learn new things in InDesign, Illustrator, and Photoshop, but still have a purpose and a finished product in the end.

This year was my Dad’s 70th birthday and we threw a big surprise party. My sister had a cake made at one of those places that has one of those fancy frosting printers and I got to design the graphic for the top of the cake. Most of the time those printouts don’t turn out well because it’s usually just a bad quality photo or just completely botched. But there is actually so much potential for it to turn out really cool!

This is what we had printed on my Dad’s cake:

And it turned out pretty neat! (Unfortunately, we I don’t have a photo of the actual cake. If I can find one, I’ll post it.)

Just one note, if you are planning on having something printed on a cake. Try not to use a graphic that has big areas of black, or all your guests will be walking around with discolored teeth! I tried to keep the black to a minimum on this one, but or course it’s difficult to not have any black if you are going to have any type of photo.

-c.

Uncategorized

Stencils

I’ve been hearing about Freezer Paper stencils for awhile now, but never got around to trying it. This is one of those crafts that sounds fun but time consuming, so I’ve always just filed it away in my brain for a later date. A little while ago, I came across the blog Ambrosia Girl and her great tutorial for Freezer Paper stencils. She made cute shirts for her adorable boys, and this inspired me to make shirts for my nieces and nephew for their birthdays. Using their initials, I made the designs on the computer then printed them onto the Freezer Paper. Of course, I made them super complicated so the cutting part took some time. But in the end, I think they turned out pretty well. This is a great way to make one-of-a-kind prints. Here is F in his shirt:

I wasn’t able to get a picture of the girls, but these are the designs that I made:

Hopefully, I’ll be able to get a shot of the girls in their shirts before they grow out of them!

-c.

My 5-year old nephew Falcon and my 2-year old niece Arwen are both obsessed with superheroes. So this Christmas I decided to make them their own superhero capes. My brother-in-law has nicknames for them; Falcon is Manboy and Arwen is Peanut. Turns out that these nicknames also work out to be pretty appropriate superhero names too!

I came up with a logo for each of them. Peanut was pretty simple and straight forward, but Manboy was a little more of a challenge. In the end, I think they both worked out well. I designed them on the computer then printed the patterns onto Heat n Bond Iron-on Adhesive paper. I ironed the pattern onto pieces of felt, cut them out, adhered them to the cape, then sewed around them for reinforcement.


I looked around online for some cape pattern ideas and ended up with a fusion between this blog post and this pattern. I’m no expert seamstress so I was delightfully surprised when they turned out better than I expected.


Here is a strange action shot of the two of them with the capes on:

–c.

This past October my sister had her 4th baby, a little girl named Phoenix! For her Christmas gift I made her a little quilt, which was technically the first quilt that I have ever completed.


I started a quilt for our baby a few months back, but have yet to finish it. The one I made for Phoenix is a lot smaller than the one I’m making for our baby and it turned out to be a good learning experience. I almost tore my hair out a couple times, but overall I’m happy with how it turned out. I’m confident that I am now better equipped to handle a larger quilt next time around.

I made this quilt out of flannel and though in the pictures it looks good enough, it’s by no means perfect. Honestly, I don’t really know how to sew too well and half the time I’m just improvising as I go along. There are plenty of puckers and bunches in places, but oh well!

Here are some detail shots:


-c.

Welcome to the first installment of “Christmas Gifts 2009,” where you’ll finally get to see what we’ve been up to the past couple months!

In the past, I’ve really gone all out on the wrapping but this year I kept it simple: store bought paper and ribbon. One thing that I did do was design gift tags. They turned out better than I expected! I really think it’s the way to go if you want to do something fun but not spend a million hours wrapping gifts all fancy.

And what are in those little boxes? You’re probably wondering… Acorn necklaces for my nieces Monica and Abigail!

I found this tutorial on how to crochet acorn necklaces from one of my favorite blogs, Resurrection Fern (a blog I briefly posted about a little awhile ago.) A few months ago Andrew and I gathered acorns in the woods behind my parents house. I’ve actually made quite a few of these necklaces, experimented with different yarns, strings, and embroidery flosses; and I’ve decided that crochet thread worked best for me. It comes in different thicknesses but I prefer it on the heavier side. It gives the necklace a nice weight.

One thing about acorns! If they’ve been on the ground for a little while, you might want to bake them before you put them in the necklace. Otherwise, you might find little ants crawling all over you! Better yet, just don’t use any acorns that have little holes in them. I learned the hard way.

–c.